Today is 13th March 2015, it's my Maa and Papa's 33rd Marriage Anniversary! I make gifts for my friends and relatives, so there isn't a possibility in all of the universe (universes, if you believe in multi-verses) that I won't make one for my parents' anniversary.
It's their "33rd Marriage Anniversary" and normally wedding anniversaries have some symbol connected to them like 25th has Silver and 50th has Gold, but 33rd doesn't have any traditional symbol associated with it. I had already decided that whatever I am going to make for them will be related to, or inspired by the symbol for 33rd anniversary to mark it special. So I searched and found out that there is a new Modern-Day list of symbols for almost all anniversaries and only the 33rd Wedding Anniversary has a modern-day symbol as "Amethyst".
Amethyst is a gemstone (a violet variety of quartz) which comes in various shades of purple, from lightest lavender to dark, reddish purple. Sometimes this purple, translucent stone has white or green inclusions also (however, honestly I was absolutely not aware of this fact about inclusions till I started to write this post and had a chance discovery of this fact when I had to look for how to describe Amethyst! Will tell you later why it is important.)
Anyways, so I decided to make a layout for them and take this opportunity to try my hand in making a mixed media project for the first time.
So here is the Amethyst-inspired 33rd Wedding Anniversary gift for my parents:
Let me give you a tour of the whole layout and I will tell you how I created these individual elements.
First of all, I had a rough idea as to what will be the color combination of my creation, that being purple and white (green was not even in my mind at the time when I conceptualized it or even when I started working on it).
The fabric lace and purple rhinestone:
I added rhinestones as an afterthought, sort of replica of Amethyst gemstones!
The Sentiment:
I decided to highlight my sentiment with a frame around it. First I stamped a flower wreath using black ink on white cartridge paper. Since I do not have any acrylic block for stamping, I used a clear plastic box. I stuck the stamp at the base of the box, covered it with ink. I left the lid of the box open and then stamped it on paper by dancing my fingers inside the box, over the stamp to give an even pressure. Well , it is true when people say that necessity is the mother of invention!!!
 |
| Ooh I love the detailing on this stamp! |
But I wasn't satisfied with the plain white color, so I colored it with pencil colors. Here again I tried couple of times to decide the look that would go with my layout. Finally I decided to color all the flowers in the stamped image with purple and all leaves with 2 shades of green, dark and light! Finally I cut the stamped image out and removed the inner blank portion as well, making it look like a frame. I pasted a small strip of purple pastel paper at the back of the image and wrote the sentiment with Pearl White 3D outliner. I used foam tape to raise them off the BG.
The purple and white flowers:
I started by making quilled roses with strips of different shades of purple. But after making just one quilled rose, I realized that this won't do because I need bigger flowers for my layout. I had come across flowers made out of paper spirals a long, long time back and I had wanted to make them ever since. So I decided that this is what I am going to do to make flowers. However, to make these, neither could I use die cutting machines or dies (as I don't have either of them) nor could I get it printed (as I had no idea how many would I need). So I tried to make a couple of them using trial-and-error method with scissors. I wanted my flowers to have look of petals therefore, rather than using simple scissors, I used my fancy ones.
After a few tries, I came up with a proper way to make these flowers which I am sharing with you. If like me, you don't have dies and die cutting machines or cannot get template of these flowers anywhere, you can use this simplest of methods to make these gorgeous flowers. And the pros of using this method is that you need very few basic supplies like pencil, eraser, paper and scissor; you can play with a lot of variations in your flower like you can decide the color of the flower, you can play with the size of the flower, you can make the flower as dense as you want! And, of course, you can minimize the amount of waste paper. And they just look fabulous in 3D. Without further rambling, lemme give you the tutorial for it.
 |
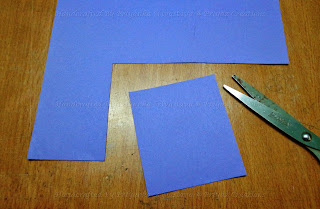
| Cut a square out of the paper |
 |
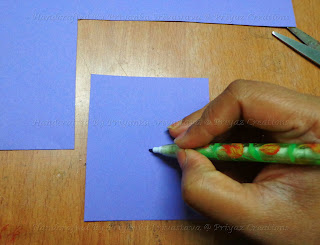
| Start drawing a spiral from the middle of the square |
 |
| Finish the spiral at the outer edge of the square |
 |
With light hand, erase the pencil marks so that only
a trace is left on your paper and no pencil marks
are visible in your flower |
 |
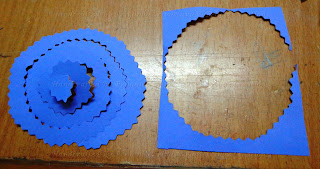
Now cut along the trace of the spiral . Start from the outer edge
and finish with the middle of the spiral |
 |
| You will get something like this |
 |
If you are someone like me, you will keep the rest of the waste
paper to be used in some other way in some other project. |
 |
| Fix the outer edge of the spiral in the slot of quilling needle |
 |
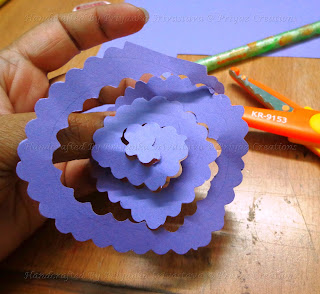
Now with the help of quilling needle,
start rolling the spiral from outer edge |
 |
Once you complete rolling the spiral around needle and
reach the middle of it, put glue at the base of all
the layers to fix it |
 |
| Let the glue dry and you flower is ready |
The numbers:
These were hand-drawn and cut out of the same paper which I used as BG. To highlight them , I mounted them over shimmery white handmade paper and roughly cut it out in oval shape. But still they looked very plain so I used purple rhinestones to add some bling and they just looked perfect instantly. Then I used foam tape to raise them off BG.
The photo- corners:
Using the same paper as BG, I stamped a flourish on it with Versamark watermark ink. I then sprayed pearly white Perfect Pearls on the stamped image to add more shimmer. I added another layer of white handmade paper beneath the purple one and painted the edge of purple with pearl white acrylic paint.
The quote:
Got the quote printed out on a normal photocopy paper and cut it out. Then I pasted it on BG and highlighted it using silver metallic paint pen.
The leaves:
When I finally added all the elements, I still thought something is off about it, it didn't quite looked complete. I pondered over it for a long time and then it stuck me! The green petals in the stamp were looking a bit off and odd one out since they did not have anything else on the whole layout to go it. And the flowers were looking a bit plain and laid back. Then I got this idea! Why not add leaves to the flowers as it will add the pop to the whole layout due to contrast and will also compliment the colors in the stamped image linking it more with the layout. I wanted leaves to be 3D like flowers and of same two shades as used in the stamp and luckily I found both the color papers in my stash. Here is a small tutorial on how you can make them too. Remember how earlier I told that I wasn't aware of the Amethyst having inclusions? What a co-incidence is this that I had decided to add this particular color to go with my purple and white theme! Now it is indeed truely Amethyst inspired! (however I came to know about the colors of the inclusions in Amethyst way after I completed and presented it to my parents!!!) :-D
 |
| Roughly draw outline of a leaf on paper |
 |
| Cut it out |
 |
| Now score along the mid rib of the leaf |
 |
If you don't have a score tool like me,
use the back of the paper knife to do the scoring |
 |
| Now draw the veins of the leaf with a sketch pen |
 |
| Minutely fringe the edges of the leaf with scissor |
 |
Now fold the leaf gently along the
scored midrib to give it a 3D effect |
 |
I made leaves in 2 shades of green,
the same shades I used in coloring the stamped image |
Finally I mounted the whole layout on a cardboard covered with white photocopier paper. I also made a stand for it at the back.
My parents were so happy to get this as a gift! And if they are happy, I am happy too!
 |
Tea light candle stand for Papa,
their previous anniversary gift from my brother |
 |
Tea light candle stand for Maa,
their previous anniversary gift from my brother |
 |
This year's gift standing between the candles,
you can see the soft glow of the tea light at the lower right potion of the layout |
They suggested me to enter this creation in a challenge. I am linking it to:
Beyond Grey Challenge: Mixed media challenge - I used, fabric, memento ink, watermark ink, metallic silver paint, perfect pearls, pearly white acrylic paint, rhinestones, pearls, sketch pens, color pencils, handmade paper, pastel paper, cartridge paper as different mediums in this project.
Cheers!


